DIY Jewelry: How To Make a Collar Necklace

A while back, we introduced you to the trendy peter pan collar. We had some mixed feelings about the collar, especially since while it looked fabulous on celebs like Emma Watson, we weren't sure how well we'd work it ourselves.
However, I've found a way around this! A collar necklace is super cute, trending right now and surprisingly easy to DIY! This all makes it a great Sunday afternoon craft for any level of DIY'er and because you're making it yourself, you can customize it fit your frame and jazz it up with all your fave baubles!
For my collar necklace, I am using fabric from an old thrifted leather skirt (that didn't even fit when I first bought it, I know, bad Alexandra!). I bought a fake pearl necklace from the dollar store to use to bedazzle my necklace and I'm using some ribbon.
You'll also need:

Scissors
Construction Paper
Pencil
Hot Glue Gun
Needle and Thread
Pins
Step 1: Create a Pattern

Create a pattern for your collar necklace but trace an outline on the construction paper and cutting it out. I went with a curvy, round shape but you could also try pointed triangle edges, like on a button down blouse. You will probably have to play around with your pattern to get it the right size and shape. You can use an existing shirt collar you have to trace or for a guide or you can just freehand it and hold it up to test what it will look like.
Step 2: Cut Fabric

Fold your fabric in half, pin your pattern to the fabric and cut it out. I suggest using a fabric that doesn't fray easily, leather, or in my case, pleather, is especially good for this.
Here's what you should have:

Step 3: Attach

Use the needle and thread to sew your two pieces together in the middle. You will most likely need to overlap the two pieces. Hold them up on your collar bone, or wherever your necklace will sit to see where you should attach them. You may want to make a small mark with chalk or using a pin.
Step 4: Get Bedazzling

Use your hot glue gun and whatever beads, sequins or embellishments you chose! If you're feeling extra crafty and looking for a challenge, you can sew the pieces on individually, or not, if you're anything like me.
Step 5: Tie On
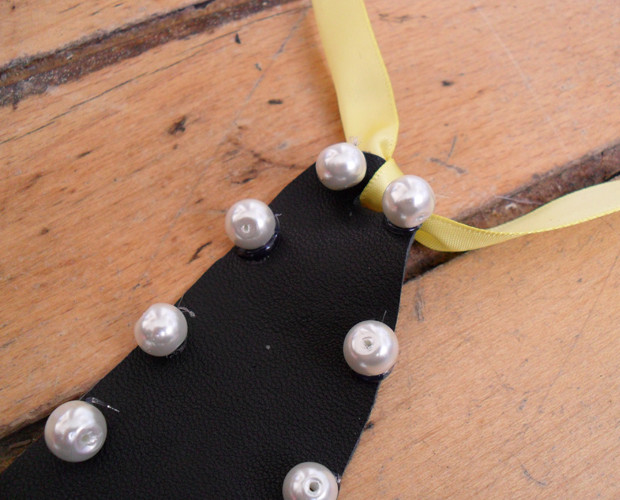
If you have a leather hole puncher on hand, puncture a hold at the edges of your necklace. Or, simply cut a small slit with scissors. I am using ribbon for attaching the ends of my necklace but you could also use a chain.
Step 6: Clean Up

Hot glue guns can leave behind some messiness, so be sure to clean and get rid of the excess.
Final Product

What do you think of my new peter pan collar necklace chicks? Is this something you'd DIY?
Facebook Comments


Related Articles


Previous Articles