DIY: Dip Dye Bleaching Ombre Denim

My denim shirt is one of my favourite, go-to pieces in my closet. They're so easy to wear because they go with just about anything. They're trendy but comfy and can be dressed up for a chic, sophisticated look or dressed down for a casual, weekend look.
I recently bought a sleeveless denim button down at a thrift shop for $1.50 (right???) and I thought to myself, 'hmmm, how can I make this even better?'. I've always wanted a dip dyed denim shirt for an ombre effect so I thought that this was the perfect opportunity.
Now, I have bleached denim before with disastrous results so I was a bit nervous. I checked out this tutorial for some basics, I made some adjustments and I have to say, this time around it was pretty simple and turned out really well. It took a little longer than expected but it's not an attention demanding DIY so you can leave it be and in the meantime get some other errands done.
Here's what you'll need for your own dip dying denim:

Bucket
Bleach
Water
Denim
Stick (I used the end of a broom)
Gloves (to protect your skin)
How-To:

Step 1: In the bucket, add 1 part bleach to 2 parts water. I actually found that I needed a bit more bleach, especially when to get the shirt to a light blue so you may want to add a bit more as you go along. I only had a smaller, round bucket on hand but if you have a square shaped bucket this will be best as it will provide a more even distribution of the bleach. Then, string the stick through the t-shirt for easy diping.
Step 2: Dip Dying Part 1
To dip dye, you'll want to first submerge the shirt all the way in or until you reach the desired point. I put mine in all the way until about the shoulders. Remember that the bleach will bleed upwards so if you want the dye to start at the shoulders, leave a good 1-2 inches for the bleach to run.
Leave the shirt in the bleach for a good 15 minutes at least. This should get the shirt to a lighter shade. After 15 minutes (give or take a few), take the shirt out.
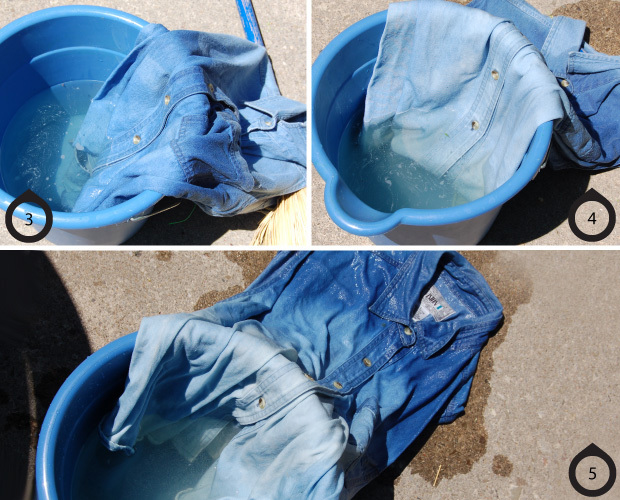
Step 3-4: Dip Dying Part 2
Re- submerge the shirt again, this time not all the way in. I kept out a good 4 inches the second time around. Again, leave in for anywhere from 10-15 minutes before taking out. You should start to see some lightening but don't worry if you can't see a lighter shade at the top portion of the shirt just yet. I only saw the lightness after I washed it. Keep repeating this process, each time submerging less denim into the bucket. It isn't necessary to do regular intervals, I just played it by ear for this.
Step 5: When you get to the bottom portion, you'll need to dip in bucket and keep it there until it turns to the desired lightness.
Tip: Remember that when using bleach, the more bleach there is in the mixture or longer you leave it in, the lighter it will get. I actually had to leave my shirt in for about an hour but it can take anywhere from 30-60 minutes. If you leave it in too long, the shirt will turn an unattractive shade of yellow so be sure to check on the shirt but otherwise, you can leave it there and check every 15 or 20 minutes.

Step 6: When you have the desire shade at the end, take out the shirt. Then, in a bucket mix 2 parts water to 1 part vinegar. Soak the shirt in the mixture for about 10 minutes. This stops the bleaching process. The last step is washing the shirt as you would normally, but by itself.
Final Look

This is my final product! Around the pocket area, I keep the entire portion of the shirt in a bit too long so it didn't turn out as ombre'd as I would have liked but it still looks pretty darn good if I do say so myself!
What do you think of this project? Is it something you'd try?
Facebook Comments
22 Comments
 | Be careful putting something that is bleached in vinegar because it creates chlorine gas, which can be very dangerous. I just made some in my basement doing this. Pants look good though. |
| Wonderful Blog |
|
|
 | Looks nice! |
 | That looks great. I'm definitely trying this out. Thanks. |
 | Cool idea. I love ombre even if I don't like the denim on top trend! |
 | tres chic! |
 | i love this! MUST. TRY. THIS - or alexandra you can just do it for me :) |
 | Now this is great!! I would definitely give this a try!! |
 |
|
Add Comment:
Related Articles


Previous Articles