How To: Clip-In Hair Extensions In 9 Simple Steps

Wouldn't it be fun to have long hair without having to grow it for 3 years and pay upwards of $2,000 dollars for salon extensions? I have been wearing clip-in extensions daily for the past 3 years and after 1000+ run-throughs I have learned the hard way what works and what doesn't.
Check out my 9 tried 'n true steps to master this technique:
 Lauren "before"
You Need: A brush, a fine tooth comb, a large clip, 4 extension pieces (or more depending on the desired look), hair spray, and your preferred styling tools.

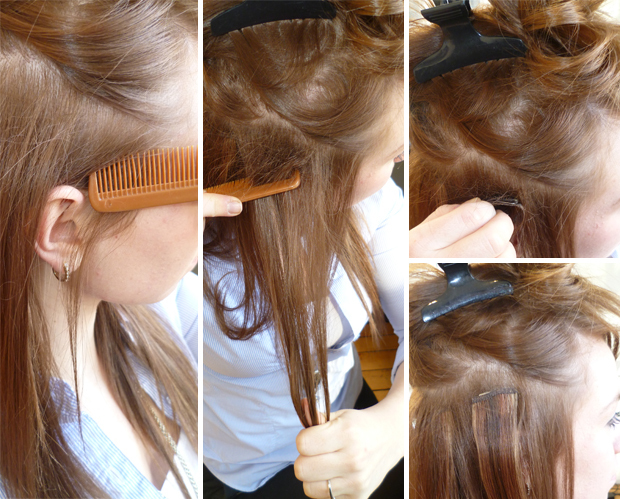
Step 1: Brush your hair and the extensions so that they are both free of tangles. It's also easiest if they are straight when you are putting them in, that way you can style them to look like they naturally flow together.

Step 2: Start from the back of your head and work up. Pull all of your hair into the large clip but leave a small section of hair down from about an inch up from your ear lobes.
Step 3: Tease the roots of this small section, starting from above, then from underneath. Depending on how thick or silky your hair is will determine how much teasing you will need to do for the extensions to stay secure. Very silky or thin hair may need some hairspray over the teased section.
Take one of the wide extension pieces and clip the centre clip (the package may refer to it as a wafer) to the midpoint of the back of your head where you teased the root, and push the clip so it is secure. Try to get as close to the roots as possible for maximum hold. Repeat with the two outer wafers.

Step 4: Let your hair down, separate another small section of hair from the top of ear across. Then repeat Step 3 to tease and clip in the second wide extension piece. Repeat as needed if you have 3 or more wide pieces to put in (depending on how thick you want your hair to be).
Note: make sure you always leave a significant amount of your own hair at the top so it safely covers all of the clip-ins.
Step 5: Let your hair down again. This time separate it so that all of the hair an inch above your ears is secured on top of your head. Now tease a small section of hair an inch above your right ear and attach one of the single-clip extensions. This piece should be placed far enough back so it does not show, but far enough forward so that it naturally falls in front of your shoulders. Repeat on the left side.

Step 6: Tease the top section of your natural hair to add a little volume, this will not only add a little lift to your look it will also balance out the extra volume you have now added to the bottom half of your hair.
Step 7: Check for any mistakes or visible clips.
 Lauren "after"
Step 8: Style your new long-haired look as you wish. Depending on the length and cut of your natural hair some people will look better adding waves to their hair and the extensions to blend nicely, while others will be able to wear them straight. This might also include trimming the ends of your extensions so there isn't a huge divide between your natural hair and the added pieces.
 Before and After
Step 9: Work it! Own that new head of hair--after all, it is your hair ... You paid for it!
You can find 100% human hair extensions packages at Sally Beauty Supply Store for around $100 depending on the length and the brand. My number one piece of advice is to make sure the colour you buy matches your hair almost perfectly (or be prepared to dye them both to match), you want them to look natural.
My 3 Cardinal Rules of Clip-Ins:
(1) Always check that there is enough hair covering the clips
(2) Tease Tease Tease! There is nothing worse than a clip sliding out and suddenly your hair is on the floor (or the parking lot pavement - I told you I learned the hard way)
(3) Make them look natural - as long as you use human hair you can cut, dye, wash, and style them however you wish
Have you tried clip-in extensions? What are your top tips?
Facebook Comments
14 Comments
 | Blog |
| Great guide! You made it look really simple and natural. I'll have to use this once I get the hair extensions I just ordered from Milani Hair. I can't believe you didn't even have to go to the hair stylist! It looks awesome! |
 |
|
 | My tip is if you want to save major money buy a package of human hair and sew the clips in yourself. Its really not that hard and takes about a hour and a half. And thats only because i made 2 sets for myself. I buy mine from images and shades. There is so much hair that i can make myself 2 full sets. (And thats with the hair doubled up! or if your like my cousin you can triple up the hair then sew it together to have beautifully thick extensions) Also they'll be custom made for you head. You can buy the clips in the color and size you need. Just pick up some special thread and a needle and your good to go. The hair is around 60 dollars and its really worth it cause you'll have lots left. One set including the biggest piece with 4 clips the second piece with 2 clips and the 2 side pieces with 1 clip each. (8 clips in total and 4 pieces in total for 1 set) I make two full sets because in the past I've learned that its not that easy to take your perfectly curled extensions you've spent hours curling to make them straight the next day and vis versa, plus the hair gets fried. So i have set only when I curl my hair and a set just for straight. And THE BEST WAY TO CURL YOUR EXTENSIONS is to put them in hot rollers. Your not pulling on them and they turn out perfectly. If I have a big party or event I curl my extensions in the hot rollers the day before and then the next day I curl my own hair in hot rollers then when done just snap in my perfectly curled extensions. Or if I wake up late for school and my hair is wavy i'll add a few quick curls in it with my flat iron and clip in my biggest pre-curled hair extension and pull it back in a ponytail and looks like the most time consuming perfectly curled ponytail ever but only takes 10 mins. And i always add my hair extensions in buns and up-dos it adds so much volume and hair to work with. But when doing a bun or up-do i only add one hair extension. The biggest hair extension with 4 clips. Just part your hair around the top of your ears and add there. Make sure to tease your own hair on the sides so when you pull your own hair back the clips don't show. Worst thing ever is having those clips show! |
| In the beginning no, I didn't wear them styled in an up-do or a pony. However, this past year I started really playing with them and you can wear them for ponytails you just have to position them differently. |
 | Silly question, but I imagine that when you want to wear your hair up or even in a simple ponytail, you'd take the extensions out, right? Otherwise they'd be exposed? |
 | Lauren, I had no idea you wear extensions! You have such gorgeous hair. This is really helpful and informative. Great work! |
 | This is a great article....I almost want to print it out and post it in the PATH system. Just last week, I counted at least 5 girls who had the WORST hair extensions ever. You could see where they were clipped, sewn, knotted in. Some of them had not even bothered to comb their hair or try to cover where the extensions were.... |
 | Great tips lauren! You make it look SO easy! |
| It doesn't take long at all (depending on how much you have to style them after they are in place), this look in total would usually take less than 3 minutes (6 minutes if I want to put a little wave in it). As I said it's important that the pieces you are flow naturally with your own hair this way you aren't spending extra time trying to blend together |
Add Comment:
Related Articles


Previous Articles