Nail Art Tutorial: French Manicure With Nail Stickers

As many of you already know, I make it a point in my life to make sure everyone around me is getting enough glitter in their lives. Which, brings me to this week's nail tutorial. Lorna loves a bit of bling, but she's also very minimalist and basic in her beauty and clothing choices. So, while we wanted to test out these sparkled out nail stickers on Lorna, we also wanted to find a way to tone down the 'in your face' bejewelling. With that in mind, we decided to try out a french mani using the nail stickers as accents and it turned out gorgeously!
Here's what we used:

Nail File (We like Sally Hansen Everyday Strength Medium Nail File)
Kiss Nail Dress Strips in 'Babydoll'
Essie Nail Polish in 'Bobbing for Baubles'
Tweezers
Base and Top Coat (We're using Mary Kay Base and Top Coat)
Scissors
Step 1: French Mani

First, shape your nails and buff them using a nail file/buffer. You'll need to paint the French manicure portion of your nail so apply base coat then the nail polish of your choice on the bottom of your nail. Try not to paint more than halfway up the nail. You will be covering the top with a sticker so it doesn't need to be a very clean line.
Next, match your nail with the best fitting sticker size.
Step 2: Cut to Size
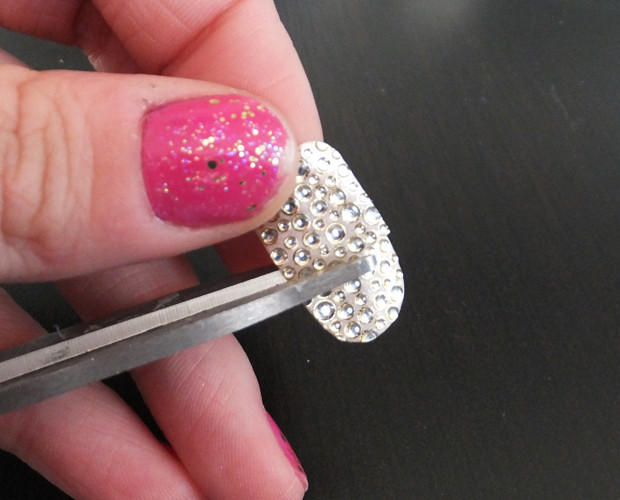
Using your nail as a guide, cut the sticker to the right size. We found that a smaller pair of nail scissors worked best.
Step 3: Cut and Compare

You'll probably need to cut more than once, keep testing and comparing the sticker size with your nail and cut as needed. Use the tweezers to handle the sticker as using your fingers will reduce the adhesiveness of the sticker.
Step 4: Stick On!

It was easiest to use the tweezers and apply the sticker from the top of the nail, starting in the middle. Smooth down the sticker with your tweezers, a file or an orange stick. You can also use your file to file away any extra sticker on the edges of your nail.

We also tried the reverse French mani by using the sticker as the tip. To do this, we first painted the entire nail with the nail polish and then used the same cut and comparing steps. You can file away any excess sticker on the bottom.
On both these looks, after applying the sticker we gave the nail a layer of top coat to make sure the sticker was secure and to make it last longer.
Final Shot

Here's Lornas final manicure! What do you think of her blinged out French mani? Is this something you'd try or have you tried nail stickers before?
Facebook Comments
22 Comments
 | These look cute on Lorna! I am personally a firm believer now in Konad stamping and trying to stay away from the stickers. I found them to be hard to remove and they came off my feet very quickly. Now I know that all depends on the shoes you're wearing as the sticker will move and slide off with heat. |
 |
|
Add Comment:
Related Articles


Previous Articles